The Best Fluffy Pancakes recipe you will fall in love with. Full of tips and tricks to help you make the best pancakes.

Table of Contents
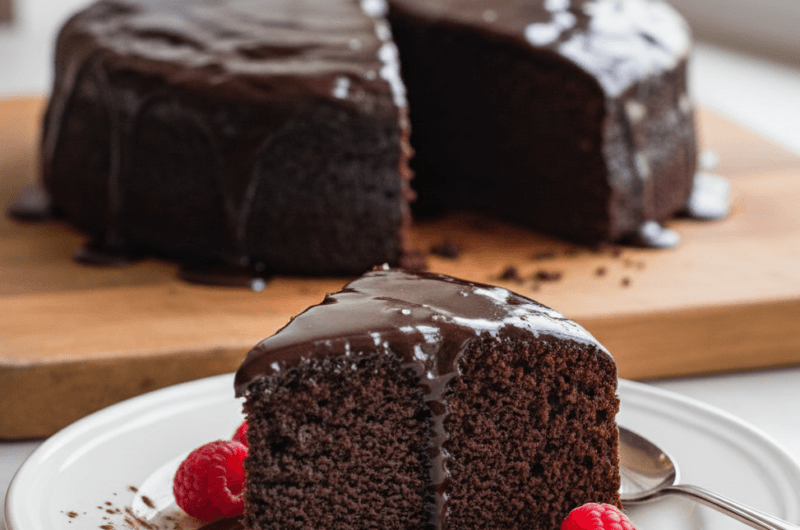
Matilda chocolate cake is a rich, moist chocolate cake finished with a warm chocolate sauce that soaks directly into the cake, creating a glossy, deeply indulgent texture throughout. This recipe is designed for home bakers who want a dependable chocolate cake that delivers intense flavor without complicated techniques or specialty ingredients.
What sets this cake apart is its balance. The cake itself is soft and tender without being overly sweet, while the warm sauce adds moisture and depth instead of heaviness. I’ve made versions of this cake for birthdays, family dinners, and casual weekends, and this method consistently produces a cake that feels indulgent but approachable. Even if you don’t bake often, this recipe focuses on simple steps and forgiving techniques so you can achieve excellent results without stress.
What This Matilda Chocolate Cake Is
Matilda chocolate cake is a moist, oil-based chocolate cake that is baked until tender and then soaked with a warm chocolate sauce while still hot.
From a technical standpoint, this recipe works because oil-based batters retain moisture better than butter-based cakes, even after cooling or refrigeration. Melted chocolate is incorporated directly into the batter, which deepens the chocolate flavor and improves the cake’s structure. The sauce, poured over the cake while it is still warm, absorbs into the crumb rather than sitting on top, creating a uniform chocolate-rich texture throughout.
A common misconception is that this cake relies on frosting or decoration. In reality, the defining feature is the soaking process, which creates a glossy finish and keeps the cake moist for days without additional layers.
Why Make This Cake at Home
Making Matilda chocolate cake at home allows you to control sweetness, moisture, and texture.
Many store-bought chocolate cakes rely heavily on sugar or frosting to create richness, often resulting in dry crumbs underneath. When you make this cake yourself, you control the bake time and sauce consistency, which ensures the cake stays soft and evenly soaked. Homemade versions are also more flexible, allowing you to adjust sweetness or serve it in different ways depending on the occasion.
I prefer this homemade version because it improves as it rests. The flavors deepen overnight, and the texture becomes even more tender, making it ideal for advance preparation.
Key Ingredients and Why They Matter
The most important ingredient in this recipe is neutral oil, which keeps the cake moist without weighing it down.
Oil creates a soft, even crumb that stays tender longer than butter-based cakes. Cocoa powder provides a chocolate base, while melted dark chocolate adds depth and richness that cocoa alone cannot achieve. Milk smooths the batter and supports even baking, while sugar balances bitterness and helps with structure. Eggs bind the ingredients and give the cake stability without making it dense.
For the sauce, cocoa powder, milk, oil, sugar, and chocolate work together to create a pourable glaze that thickens slightly as it cools. This combination allows the sauce to soak into the cake rather than forming a hard topping.
Easy Matilda Chocolate Cake Recipe
Course: DessertCuisine: AmericanDifficulty: EasyServings
6-8
slicesPrep time
20
minutesBaking time
40
minutesTotal time
1
hourMatilda chocolate cake is a rich, moist chocolate cake finished with a warm chocolate sauce that soaks directly into the cake, creating a glossy, deeply indulgent texture throughout.
Ingredients
- For the Chocolate Cake
All-purpose flour – 1 ½ cups (190 grams)
Unsweetened cocoa powder – ½ cup (50 grams)
Granulated sugar – 1 cup (200 grams)
Baking powder – 1 teaspoon
Baking soda – ½ teaspoon
Salt – ½ teaspoon
Milk – 1 cup (240 ml)
Neutral oil – ½ cup (120 ml)
Eggs – 2 large
Melted dark chocolate – 100 grams
Vanilla extract – 1 teaspoon
- For the Chocolate Sauce
Milk – 1 cup (240 ml)
Granulated sugar – ¾ cup (150 grams)
Unsweetened cocoa powder – ¼ cup (25 grams)
Neutral oil – ¼ cup (60 ml)
Dark chocolate, chopped – 50 grams
Directions
- Preparing the Cake Batter
The dry ingredients are combined first to ensure even distribution of cocoa, leavening agents, and salt. This prevents pockets of bitterness or uneven rise. In a separate bowl, milk, oil, eggs, vanilla, and melted chocolate are mixed until smooth. Combining wet ingredients thoroughly helps the batter emulsify properly, which leads to a uniform crumb.
The wet mixture is added gradually to the dry ingredients and mixed just until smooth. Overmixing at this stage can develop excess gluten, which would make the cake dense rather than tender. The finished batter should be pourable and glossy, without visible lumps. - Baking the Cake
The batter is poured into a lined or greased baking pan and baked at moderate heat until just set. The goal is to fully bake the cake without drying it out. Baking until the center is no longer liquid but still soft ensures the cake can absorb the sauce later.
I always check doneness early rather than late. Chocolate cakes continue cooking slightly after removal from the oven, and overbaking at this stage limits how much sauce the cake can absorb. - Preparing the Chocolate Sauce
While the cake bakes, the sauce is prepared on the stovetop. Milk, sugar, cocoa powder, and oil are heated gently while stirring to dissolve the sugar and cocoa evenly. Adding chopped chocolate at the end deepens flavor and improves texture.
The sauce should be smooth and pourable, not thick or boiling aggressively. High heat can scorch cocoa and create bitterness, so gentle heat is essential. - Soaking the Cake
As soon as the cake comes out of the oven, the warm sauce is poured evenly over the surface. The heat of the cake allows the sauce to absorb gradually rather than pool on top. Small holes can be gently poked into the cake to help the sauce distribute evenly without breaking the structure.
Allowing the cake to rest after soaking is crucial. This resting time lets the sauce settle into the crumb and creates the signature moist texture throughout.
Notes
- Most issues with this cake come from baking too long or overheating the sauce. Chocolate cakes should be removed from the oven while still soft in the center, as carryover heat finishes the bake. Texture matters more than exact timing.
- For first-time bakers, measuring ingredients accurately is more important than mixing speed. Consistency in batter thickness ensures even baking and proper absorption of the sauce.
- If the sauce seems thin, it will thicken slightly as it cools. If it feels too thick, adding a small splash of milk while warm corrects the texture without affecting flavor.
How to Know When the Cake Is Ready
The cake is ready when the center is set but still moist and springs back gently when pressed.
A toothpick inserted into the center should come out with moist crumbs rather than wet batter. Visually, the surface will look matte rather than glossy, and the edges will slightly pull away from the pan.
After soaking, the cake should appear evenly darkened and glossy on top, with no dry patches. The aroma will be rich and chocolate-forward without sharp or burnt notes. The cake will continue absorbing sauce as it cools, so stopping at a slightly saucy finish is ideal.
Common Problems and Fixes
Why is my cake dry?
This usually happens from overbaking or inaccurate measurements. Reducing bake time slightly and measuring flour correctly helps retain moisture.
Why didn’t the sauce soak in?
If the cake cooled too much before adding the sauce, absorption slows. Pouring the sauce while the cake is hot ensures even soaking.
Why does the cake taste bitter?
Overheating cocoa or using very dark chocolate without balancing sugar can cause bitterness. Gentle heat and proper sugar levels prevent this.
Is the cake supposed to be very moist?
Yes. This cake is intentionally soft and soaked. The structure should hold when sliced but feel tender rather than fluffy.
Storage and Maintenance
Short-Term Storage
This cake can be stored covered at room temperature for up to one day. For best texture, refrigeration is recommended after the first day to preserve moisture and prevent spoilage.
Long-Term Storage
Stored in an airtight container, the cake keeps well in the refrigerator for up to four days. The texture often improves as the sauce continues to distribute evenly through the crumb.
Reheating and Serving
Slices can be gently warmed in the microwave for a few seconds to restore softness. I’ve found that warming slightly enhances the chocolate flavor and recreates the freshly soaked texture.
How to Use This Recipe Next
Matilda chocolate cake can be served plain, with vanilla ice cream, or alongside fresh berries for contrast. It works well as a birthday cake, a casual dessert, or a make-ahead treat. If you enjoy reliable chocolate baking, this recipe naturally leads into other chocolate-forward desserts and sauce-based cakes.