The Best Fluffy Pancakes recipe you will fall in love with. Full of tips and tricks to help you make the best pancakes.

Table of Contents
A sourdough starter is a natural leaven made from flour and water that captures wild yeast and beneficial bacteria from the environment, allowing bread to rise without commercial yeast. This sourdough starter recipe uses simple pantry ingredients and a reliable daily feeding method, making it ideal for beginners who want consistent results.
I’ve made and maintained sourdough starters for years, and I know how confusing the early days can feel. This method removes the guesswork and focuses on clear signs of progress instead of strict rules.
What This Recipe Is
A sourdough starter is a fermented mixture of flour and water that develops wild yeast and lactic acid bacteria capable of naturally leavening bread.
At a basic level, flour provides natural sugars, while water activates fermentation. Over time, wild yeast and bacteria multiply, creating bubbles, acidity, and strength. This method works because it relies on regular feeding and stable conditions rather than complex techniques. Beginners often misunderstand that early activity means success, when in reality consistency over several days is what builds a strong starter.
Why Make This Recipe at Home
Making a sourdough starter at home gives you full control over fermentation, flavor, and quality.
A homemade starter produces deeper flavor and better texture than store-bought yeast. It costs almost nothing, requires no special tools, and can be reused for years with simple care. You also control the flour type and hydration, which matters for dietary needs and baking results. I still use this same method whenever I start a new starter because it’s dependable and easy to maintain.

Key Ingredients and Why They Matter
The best option for starting a sourdough starter is plain, unbleached flour and clean water.
Flour supplies the natural yeast and bacteria needed for fermentation. All-purpose flour works well and stays consistent, while whole wheat or rye can speed up early activity. Water hydrates the flour and supports microbial growth; filtered or dechlorinated water is ideal, but tap water often works just fine if it smells neutral. Simpler ingredients are usually more reliable for beginners than specialty flours.
Easy Sourdough Starter From Scratch
Course: BakingCuisine: InternationalDifficulty: MediumServings
1
starterDaily Prep time
5
minutesapprox. Calories
400
kcalThis sourdough starter is a fermented mixture of flour and water that naturally leavens bread. It works well for beginners because it relies on consistency rather than strict timing or special ingredients.
Ingredients
Unbleached all-purpose flour
Water (room temperature)
- Optional or Helpful Add-Ins
Whole wheat or rye flour (for faster early activity)
Filtered water (if tap water is heavily chlorinated)
Directions
- Early Stage (Days 1–2):
At the beginning, you’ll mix equal parts flour and water until the texture resembles a thick batter. After resting at room temperature, you may notice a few bubbles or an odd smell. This early activity is normal and does not mean the starter is ready. What matters most here is consistency—feeding the starter at roughly the same time each day helps establish a predictable fermentation rhythm. - Middle Stage (Days 3–5):
As you continue feeding daily, the starter begins to change more noticeably. Bubbles appear throughout the mixture, and it may rise slightly before collapsing again. The smell often shifts from unpleasant to mildly sour. This is the stage where many beginners think something has gone wrong, but in reality, the starter is stabilizing. Regular feedings allow stronger yeast and bacteria to take over, which is exactly what you want. - Final Stage (Days 6–7):
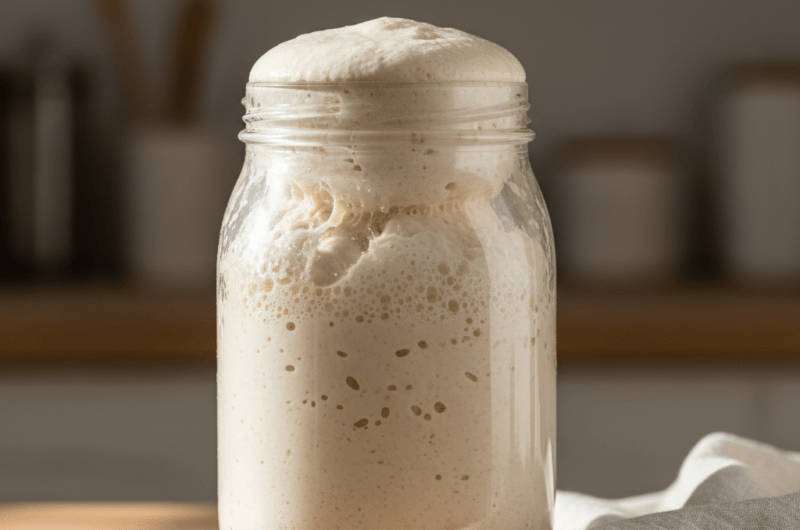
In the final stage, the starter becomes reliable. After feeding, it rises consistently and develops a lighter, airy texture. You’ll see visible bubbles across the surface and sides of the jar. When it can double in size within a few hours, it’s strong enough to bake with. From here, maintenance becomes much easier.
Notes
- Most sourdough starter issues come from watching the clock too closely instead of observing the starter itself.
Temperature plays a major role in fermentation. A cooler kitchen slows activity, while a warm spot encourages growth. Aim for a steady environment rather than moving the jar frequently. The texture should stay thick but stir able; if it becomes too runny or too dry, adjust the flour or water slightly - Smell is another important indicator. Early strong or unpleasant odors are common and usually fade as the starter matures. A healthy starter eventually smells tangy and clean, not rotten or chemical-like.
- For first-time cooks, remember that consistency matters more than precision. Feeding at roughly the same time each day, using the same flour, and observing how the starter behaves will teach you more than strict measurements ever could. Small adjustments go a long way, and patience is part of the process.
How to Know When It’s Ready
A sourdough starter is ready when it consistently doubles in size within 4 to 6 hours after feeding.
Visually, the surface should look slightly domed before it begins to fall. The sides of the jar will show bubbles throughout, not just on top. The texture should feel airy and elastic when stirred. Aroma is also important—a ready starter smells pleasantly sour, never harsh or putrid. Optional tests like the float test can be used, but they are not required and should never replace visual and smell cues.
Common Problems and Fixes
My starter isn’t bubbling — is it dead?
No. Early inactivity is normal, especially in cool environments. Keep feeding it daily and move it to a warmer spot if needed.
My starter smells bad — should I throw it out?
Strong or unpleasant smells are common in the first few days. As long as there is no mold, continue feeding and the smell will stabilize.
There’s liquid on top — did I ruin it?
No. Liquid simply means the starter is hungry. Discard and feed as usual.
It rises but then collapses quickly — is that normal?
Yes. This means the starter is active but still developing strength. Continue regular feedings to build stability.
Storage and Maintenance
Once your starter is active, the general rule is to refrigerate it if you bake once a week or less.
For short-term storage, feed the starter, let it rest at room temperature for a few hours, then store it in the refrigerator with a loosely covered lid. For long-term storage, feed it at least once every few weeks and refresh it before baking. To revive a refrigerated starter, bring it to room temperature and feed it once or twice until it becomes active again. My routine is simple: feed, observe one good rise, then use or store.
How to Use This Recipe Next
Once active, this sourdough starter can be used to bake sourdough bread, flatbreads, pancakes, waffles, and pizza dough.
It also becomes the foundation for maintaining a long-term starter or adjusting hydration for different baking styles. The logical next step is learning how to prepare and feed the starter before baking day, which ensures the best rise and flavor in your final bread.